Posted with : Audio
Editing audio for iNaturalist documentation
We can document many species using the Soundcloud integration with iNaturalist. And just like having clear photos for visual identification, we would like to have clear audio for identification. But I haven’t been able to find any good, simple explanations about how to go from a raw recording in the field to one ideal for confirming the identity of a species in the observation. This is an attempt at such a guide.
Prerequisites
-
A recording. Presumably, you’ve recorded identifiable sound(s) from an animal. The iPhone I use records in MP4 (.M4P) format
- Microphones can help. I’ve recently gotten a Rode VideoMic shotgun microphone and am mostly really happy. It occasionally produces bad background noises, but I think that’s because of the phone case interfering with a good plug-in.
-
Audio editing software. There are lots of options, but I’ve been using Audacity because it’s open source, free, and appears to work well. There’s a separate download required for importing MP4 files, but Audacity will prompt you to get the download.
-
Soundcloud account. You’ll need a Soundcloud account to link one or more recordings to an observation. An account is free for up to 180 minutes of uploaded audio.
A walk-through
For this walk-through I’ll be using this recording of some White-breasted Nuthatches calling. Throughout we use the formatting Menu -> Menu Item or Keyboard Shortcut to describe commands.
Part 1: Using the waveform
To start, use the File -> Import command to get the recording into Audacity. On import you should see something like this:
 The basic interface of Audacity after importing the recording.
The waveform representation of the recording looks pretty non-descript, but we can zoom in by placing the cursor over the scale bar on the left of the image (which the shows a magnifying glass with a +) and clicking a few times:
 The basic interface of Audacity after zooming in on the waveform.
Now we can listen to the recording by clicking the play button or by pressing the spacebar. As the recording plays we can relate sounds to the waveform, with louder sounds at peaks, and background noise filling the center band.
One shortcoming you may witness is that the playback volume is probably really quiet. To solve that problem, we can use the Effect -> Normalize command:

I’ve been normalizing to -0.05 dB:

but you should try different options (and be ready to turn the volume down).
The first part of this recording has few or no bird calls, but a big noise spike:
 We should just get rid of this part of the recording.
We can select the part of the recording to remove (dark gray), then use Edit -> Cut or Cmd + X to delete it.
The waveform highlights some bad background sounds - those big peaks - still exist, and that we would like to tamp down:
 The big spike is gone, but there are still too many noise peaks.
Here we can use Effect -> Click Removal to wipe out the peaks. You may have to play with the settings a bit - and be prepared to Edit - Undo or Cmd + Z a few times - but you should end up with fewer clicks:
 Now this is looking and sounding a bit better.
Some isolated spikes are still in the waveform, but not near bird notes:
 Still some spikes between bird calls…
and we can use the cut command (Cmd + X) to just remove them:
 …but these types of sections can just be snipped out.
Part 2: Using the spectrogram
This is about as far as I find the waveform useful. Now we want to switch to the spectrogram view to see the frequencies of the background noise and the frequencies of the bird calls. To get there, choose the drop-down near the upper-left of the file viewing sub-window…
 It took me a while to discover this.
…and select Spectrogram…

…which changes how the recording is shown:
 The spectrogram is a rather different view than the waveform.
Now we can see the nuthatch call notes as intense white patches from 1.5-3kHz (left scale). Some low-frequency spikes are visible along the bottom, and the general noise of the recording is all of the pink in the background. We can filter out the noise at frequencies higher and lower than calls to increase the intensity of the calls. The Effect -> AUFilter tool might work,
 This is one option.
if you know what you’re doing…but I don’t. Instead, I’ve been using Effect -> AUHipass

to filter out the low-frequency noise, i.e., the high frequency sounds pass through. After setting the dot to a frequency below the low-end frequency of the call / song you want to keep, you can press ‘Apply’ multiple times to chip away at the noise from the bottom. Conversely, we can use Effect -> AULowpass

to filter out the high-frequency noise. As with HiPass, you can ‘Apply’ multiple times to chip away, but from the high end. A complement to these is Effect -> AUBandpass, which allows keeping a band of frequencies.

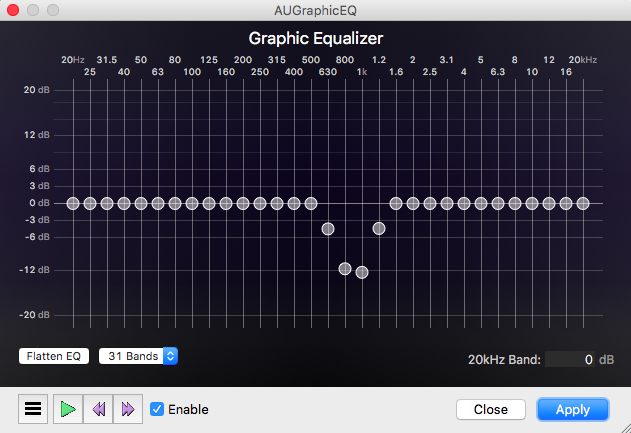
Last but not least there is the AUGraphicEQ, which, as the name suggests, provides a graphic equalizer for targeting particular frequency bands for amplification or suppression:
 The graphic equalizer shown here - which I didn’t use for the nuthatch recording - is set for suppressing a band of noise in the 630-1200 Hz range.
After applying different filters, we should end up with a spectrogram that looks something like this:
 Now we can much more clearly see and hear the nuthatches!
Last but not least, we need to export the modified file under a new file name using File -> Export Audio...:

Uploading and linking
Now that we have a cleaned file (and the original; see below), we can upload to Soundcloud and link the files to an observation. The download interface is quite clean:

You can edit the recording information as you see fit:

Also be sure to edit the ‘Metadata’ tab to adjust the copyright as you see fit. Here I’ve made the recording Creative Commons Attribution-ShareAlike.

Now that it’s uploaded, the clean file can be found here.
_Optional ?_
I previously suggested (below) that it might be worth uploading both the original and the cleaned versions of files. iNaturalist user @aredoubles noted that may not be necessary because we’re not adjusting the tempo or frequency of the calls / songs. That’s true, but I would add one caveat. One Audacity tool I didn’t mention above, but have used, is Noise Reduction, which can affect the focal call / song. If Noise Reductionis used for background noise that occurs in the same frequency band as the target call / song then it might be worht uploading the original, too.
Update 01 Apr 2016
I just saw a talk at the 2016 ASB meeting looking at bird calls across a background noise gradient. The results suggest a shift in call frequency in the face of anthropogenic noise. One limitation of the study was that it is restricted to one county in South Carolina. If we include the originals with the clean calls, then these recordings could be used in broad-scale analyses of these sorts of questions of the “soft” effects of human encroachment.
Note: Up until now I have been uploading just the best version of the recording. But as I’ve been writing this post I realized that it’s probably better to include the clean version and the original. The primary reason is that I’m a novice at sound editing, and I don’t know if I’m inadvertently modifying some part of the sound that shouldn’t be modified. By placing the original in the record, someone with a lot more knowledge might be able to get a better recording that can be used in some sort of analysis, e.g., about bird song evolution.
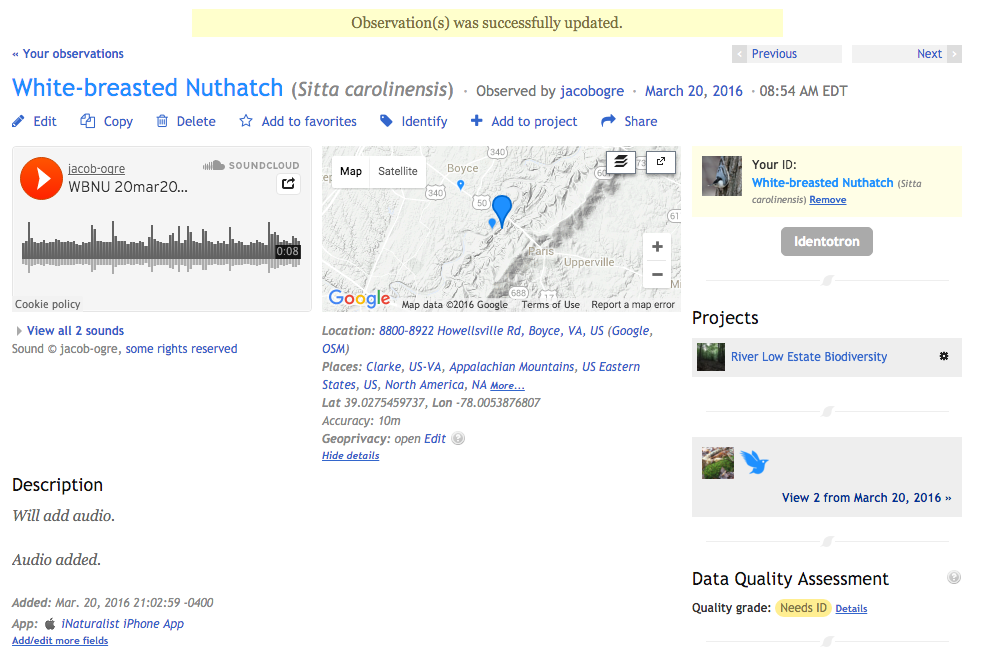
The last step is linking the Soundcloud files to the observation. In this case, I created a record using the iPhone app right after I made the recording. The recordings (original and clean) are available from the web interface, in the Add media box in the upper-right corner of the page:
 After checking the appropriate boxes be sure to save the edits!
Now the information needed to confirm an observation - a cleaned audio recording - is available.

Comments?
Until I get commenting set up here, please leave comments at this iNaturalist entry. Thanks!
Upate 29 Mar 2016
Added some clarifying text, an image of the graphic equalizer tool, and updated the note about uploading the original and clean versions of a recording. Thanks @aredoubles for the feedback!